The Virtuous CRM Email Marketing toolset has a lot of powerful functionality for segmentation and A/B testing. However, it can be a little intimidating when getting started because there are so many options and the tool is built differently than a lot of other email marketing tools like Mailchimp and Constant Contact. This article walks through some of the best practices to get the most out of your emails in Virtuous.
Templates
Most emails should start with an email template to speed up the email building process. It is recommended that you have at least 2 templates, a plain-text template and a newsletter template. You may have more than this, but that would be the minimum.
To create a new email based on a template, navigate to the “Email” tab in Virtuous Marketing and select “Templates” from the top center menu.

Find the template you’d like to use, click the three dots underneath it and choose “Copy”.

Give your email a name and make sure to choose “New Email” instead of “New Template”. If you choose “New Template”, it will copy to a new template file type and you will not be able to choose any recipients for the email.

Email Setup
Once your email has been created either from scratch or from a template, the first screen you’ll be taken to is the “Email Setup” tab.
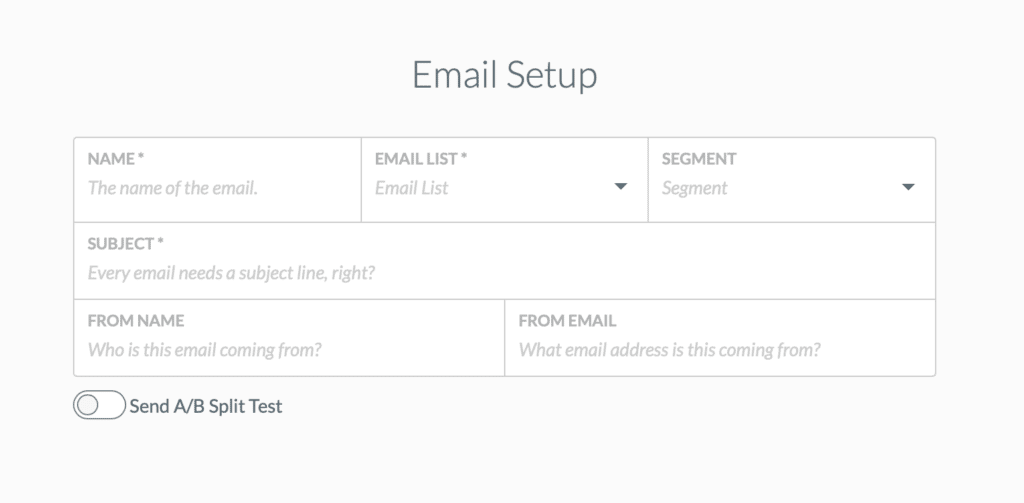
Name
The name of the email must be unique in your system. This is for internal use only, so use something that makes sense to your team. It may be helpful to include the type of email in the name (example: Newsletter: September 2021) because it will be much easier to find your emails later using the filter tool on the sidebar of the main email page in Virtuous.
Email List
Think of email lists as the “genre” of email you are sending, not as the specific people you are sending to. There will almost always be more people subscribed to the email list than people you actually send the email to, because you’ll be able to narrow down your target audience on the “Target” tab. The email lists should be general and broad. These are the categories that the donor will be able to subscribe/unsubscribe to. Examples might be “General Communications”, “Welcome Series”, “Newsletter”, “Program Updates”, etc.
Segment
If you are using Virtuous Giving, you can set a marketing segment code for the email. All of the links in the email will automatically have this segment code added to them, so you will be able to track the success of your email.
Subject
This is the subject line for your email that the donors will see. You can add merge tags into your subject line. Go to the next tab into the email builder, select your merge tag, then copy and paste the merge tag into the subject line.
From Name/Email
The from name and email address will default to your organization’s name and generic “[email protected]” email address. It is recommended that you change this on most emails to be from an actual person at your organization to help with email engagement and also show authenticity.
A/B Testing
You can use the “Send A/B Split Test” toggle to choose to test either open rate (subject line + from name/email) or click rate (email content). It is recommended that you do A/B testing on every email you send out and use the data from each test to inform your future communications. If you click on the toggle, you will see a link at the bottom to the support article that explains the A/B testing functionality in much more detail.
Build
The build screen lets you add all of your content to the email. You can add merge tags to the email using the text tool. Add the text block, and then click into it.

If you click on “Merge Tags” option, you’ll get a list of all of the available merge tags. Click the one you want to use and it will be added to the text block.

Note: Because emails are sent to individuals, not to households/organizations/foundations, it is recommended that you use the “First Name” merge tag instead of “Contact Informal Name” merge tag. You want to say “Hello Jonathan” when you send Jonathan a direct email to his personal email address, not “Hello Jonathan and Katelyn” which is what “Contact Informal Name” would display for Jonathan and his wife.
Target
Once the email is built and is ready to send, navigate to the next tab: “Target”.
By default, “Send to Email List” will be selected and you will see a count of all the individuals in your database that are currently subscribed to that list. However, as mentioned earlier, you will almost always want to use a query to specify the exact individuals that you want to send to. You can read more about how to build Email Queries below.
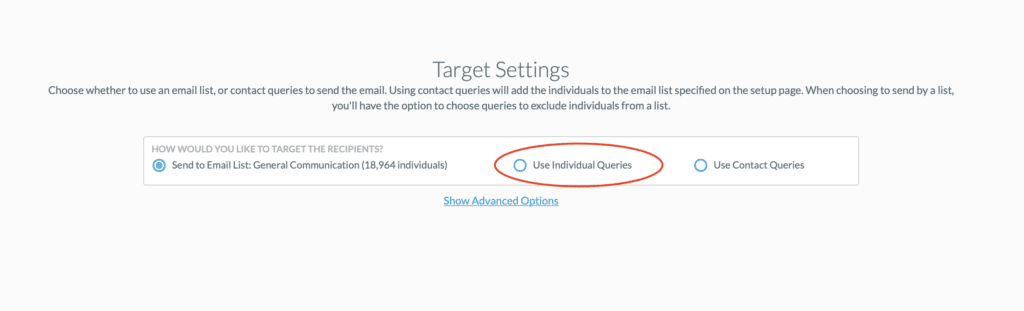
Click on “Use Individual Queries” to select the query you would like to use to include or exclude individuals in the email distribution list for this specific email.

A few things to note:
- You will need to have your query already built before you can link it. If you get to this step and don’t have your query ready, you can save the email, build the query, and then come back to this screen to complete your targeting.
- The query must be an “Individual” query because emails are only sent to individuals. If you want to send to individuals inside of another query type (like “Contact” or “Gift”), you can build a nested query with the single line “Contacts – In – {Name of Query}”.
- Virtuous will not send to individuals who have unsubscribed from the list you specified in the first step of the email builder. So if you see that your email is sending to less individuals than appear in the actual query results, don’t be alarmed. The other reason that the result counts may differ is because the query results will show you individuals without an email address on their record unless you specific “Has Email? – Is True” in the query itself.
- Anyone who is in the email query that you send this email to will automatically be subscribed to the email list that you chose in the first section of the email builder. It is important to make sure that your donors have opted in to this type of communication and that you give them a clear way to opt out, as well.
Specify
The specify tab lets you choose when to send your email. You can send it immediately or schedule a date in the future.

Note: The email scheduler will always show your personal time zone that you set when you created your Virtuous account. It is not tied to your current location or any of the organization settings. If you need to change your account’s time zone, you can do so by clicking on your profile picture in the top right corner of the screen and choose “Edit Profile”.
Send
The send page will run the query associated with the email and display a final count of the total number of individuals that Virtuous is going to send the email to. If the number looks correct, you can click send. If the number looks strange, you can cancel and go back to the email query to troubleshoot the issue.
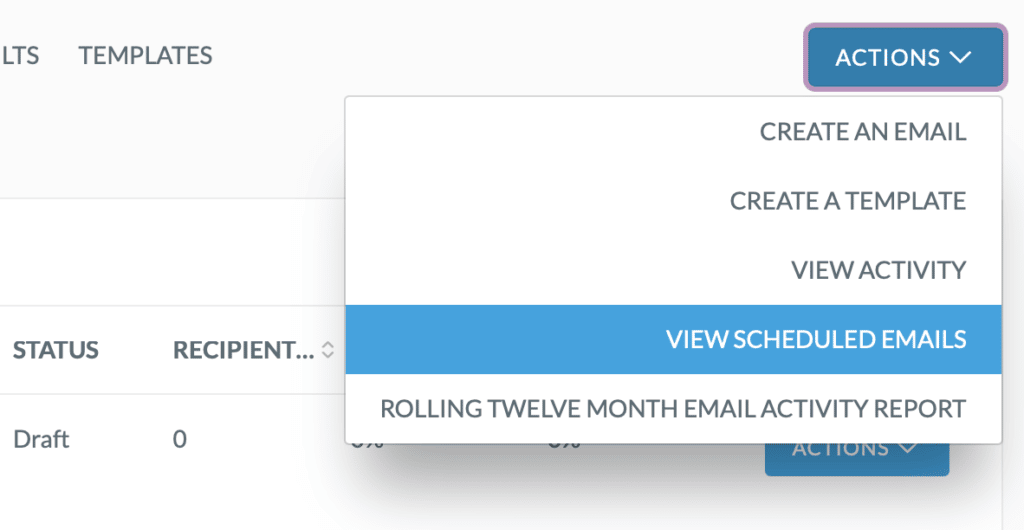
Scheduled Emails
Scheduled emails can be found by going to the main “Emails” page in Virtuous Marketing and clicking “Actions” > “View Scheduled Emails”.
Building Email Queries
Building email queries is simple. There are a few questions to ask yourself as you build each email query.
- Who should receive this email and what parameters are specific to them?
- example: I want to send an email to everyone who gave a single gift of at least $50 in the last 12 months.
- Who should not receive this email and what parameters are specific to them?
- example: I don’t want to send this email to any board members, major donors, or anyone who has called in to our office and asked to be removed from our email list.
- Can I build this all in an “Individual” query, or do I need to nest queries to capture all of the necessary parameters?
- example: In the statements above, we’ll need to use a nested gift query because individual queries only give us options like “last gift date/amount” or “first gift date/amount”. We don’t have a way to check all of their gifts in the last year unless we use a gift query.
After answering these questions, we can start building our email query. It is recommended that you start with the nested queries first, if you have any. It is also recommended that if you have a few parameters that you will ALWAYS use to exclude people from emails, you save that as its own query so you don’t have to retype those parameters every single time you create an email query.
For our example above, this is the process we would follow:
- Create a new “Gift” query with 2 lines
- Gift Date – After – One Year Ago
- Gift Amount – Greater Than or Equal to – 50

- Create a new “Individual” query to act as our filter for all of the emails that we’ll ever send
- Tag – Is None Of – Do Not Email, Major Donor, Board Member

- Finally, we’ll create our “Individual” query that we’ll use in the “Target” section of the email builder to actually send the email. Contacts – In – {Name of Gift Query}
- Contacts – Not In – {Name of Filter Query}
For most emails, tags are the easiest way to segment. This means that for most emails, you won’t need to nest any queries. You can just write a one line “Individual” query that reads “Tag – Is Any Of – {List of Tags}” and the email will send to everyone who has that specific tag.
Resend to Non-openers
After sending an email to your contacts, it is possible to resend the same email again to anyone who didn’t open the original email.
- Navigate to the “Queries” tool in Virtuous and click on “New Query”. Select “Sent Email” from the “Query Type” dropdown and name your query something unique that you’ll be able to find again later.
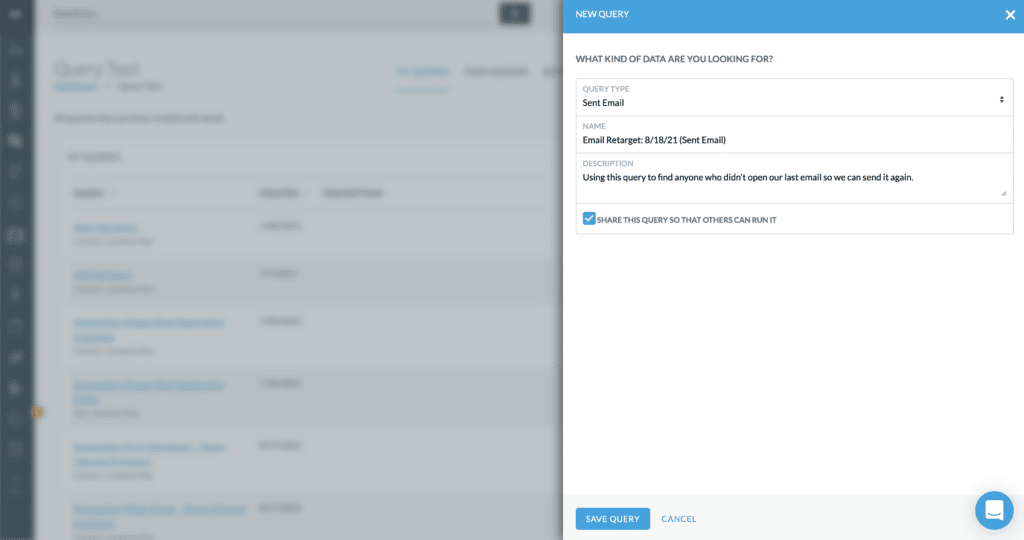
- Add 2 lines to the query:
- Email Name – Is – [Exact Name of Email]
- Opened – Is False

- Save your query and click on “View Results” to make sure you’re pulling in the expected number of contacts. If you get zero results, double check that your email name exactly matches and doesn’t have any extra characters.
- Go back to the main Query Tool page and create a new Individual Query. Name it something unique that you’ll be able to find quickly later.
- Add a single line: Individuals – In – [Name of Sent Email Query Set Up In Previous Step
- Save your query and click on “View Results” to make sure the query is actually pulling in the expected contacts.
- Navigate to the Email Tool and duplicate the email you want to send. Name it something unique, change the subject line, sender info, and content if necessary, then navigate to the “Target” step.
- Click on “Show Advanced Options” and search for the query built in the previous step.

- Click on “Next” to schedule the email, then click “Send”. The email will only send to the segmented list that was selected through the queries built in the previous steps.
Exclude Donors with Specific Parameters
It is possible to create any type of segmentation for emails. You can exclude donors who have given in the past 2 weeks from getting additional emails during a year-end campaign. You can only send to nondonors. You can send to all donors who have given a single gift of $317, have never opened an email, and live in Colorado. The sky is the limit.
If the parameters you are using can be found in an individual query, then you won’t need to nest any queries. For example, if you wanted to send to everyone with a specific tag, or based on “first gift date”, “last gift date”, or other milestones, that can all be done in a individual query. Just add a line for each parameter, save the query, and then use that query as your target when you go to send the email.
